June 29, 2023
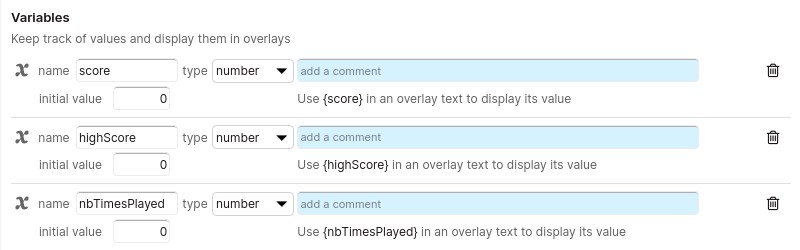
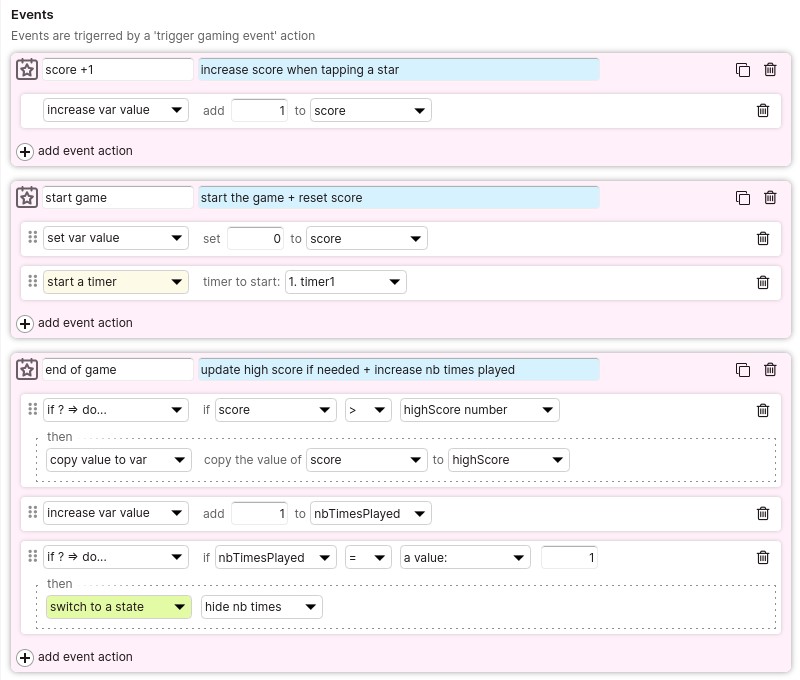
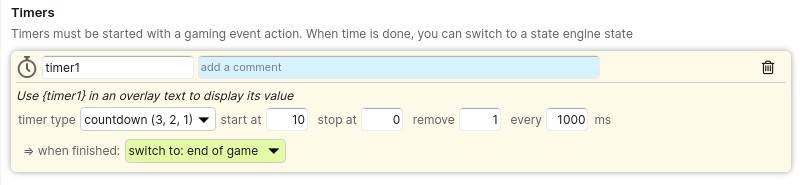
With the XR+ no-code gaming module, manage scoring, timers, variables, generate random values, and set conditions (if -> then).
The gaming module is the perfect tool to make web AR/ web VR mini games.
This module is not available on basic accounts, contact us for more details
June 28, 2023
To add a sound effect or a music to a scene, import an audio file to the library and add it to a scene.
You can use the scene timeline to delay the starting time of the audio
When leaving the scene, all audio items included in the scene are stopped.
Audio items have 2 modes: ambient and spatial
Ambient audio have a constant volume
Spatial audio volume depends of the distance between the user and the audio source. You can place a A spatial audio anywhere in the scene and choose its max distance, symbolised by the sphere rings.
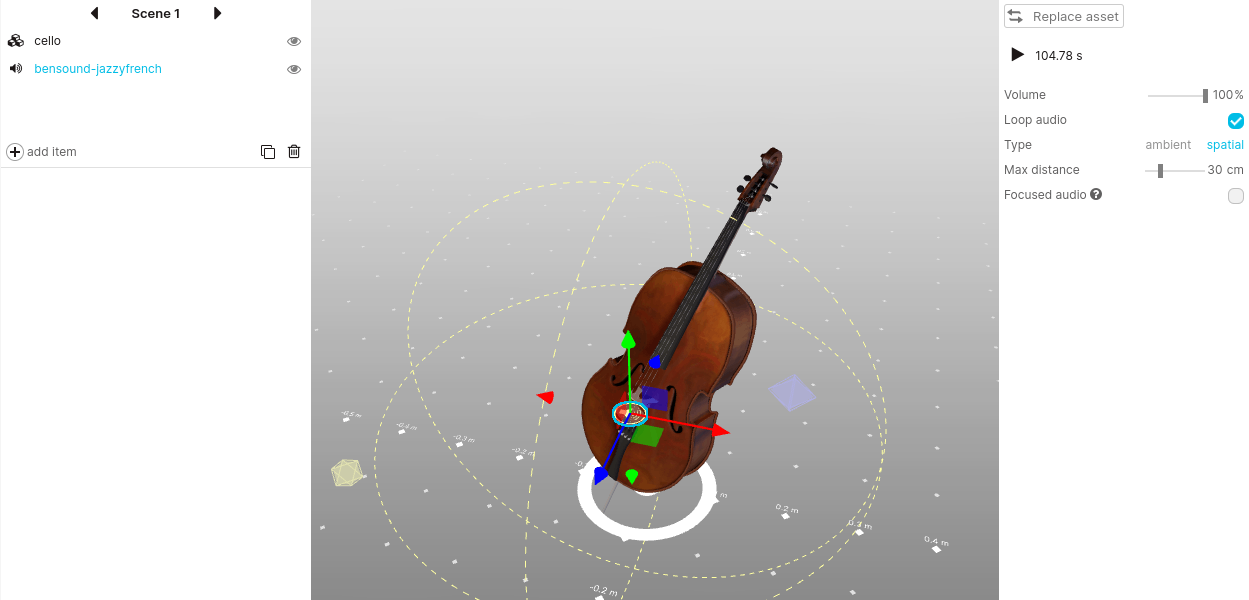
If a user is outside of the sphere, the audio item volume will be null.
If a user is inside the sphere, the audio volume is set considering its distance to the audio position. The closer to the source, the higher the volume.
Focused audio are only audible if the audio source is within the user field of view ( visible on screen )
Keep and audio playing between scenes
If you need to play a sound that should not be interrupted when changing scenes, don’t add to a scene, instead, use the Play audio action from the States engine to start playing the sound
September 10, 2022
The XR+ javascript API let developpers add front-end functionalities that do not exist in XR+, it also allows for a deeper UI / screens customization.
The API is a project module to enable in the studio
The API allows javascript file and CSS files to be loaded in the <body> of the project web document, with the usual <script> and <style> tags.
You must host those files, they are not hosted by XR+.
We provide a simple example – a javascript class – on how we recommend to communicate with the XR+ elements of the experience.
You can register and listen to particular events such as when the experience starts, or when an image marker is found/lost.
You can also setup your own events with the XR+ studio action editor. By doing so you can trigger an action on a composition item to call a function you have defined in your script.
download the javascript API class example
Those libraires are loaded by all projects and ready to use with the API:
considering: var XRAPI = new XRAPI_V1({});
| XRAPI.getIsLibraryLoaded(); | check if project library is fully loaded | boolean |
| XRAPI.getIsStarted(); | check if experience already started | boolean |
| XRAPI.getThreejsScene(); | get threejs scene | threejs scene |
| XRAPI.getCompositionItemByName(“my item name”); | get a composition item threejs root object by its name | threejs object |
| XRAPI.getCompositionParent(); | get parent off all threejs objects on the scene | threejs object |
| XRAPI.getDesktopScreenDomElement(); | get web dom element: desktop screen | dom element |
| XRAPI.getLoadingScreenDomElement(); | get web dom element: loading screen | dom element |
| XRAPI.getStartScreenDomElement(); | get web dom element: start screen | dom element |
| XRAPI.getMainScreenDomElement(); | get web dom element: main screen | dom element |
| XRAPI.goToScene(index); | change scene. Use index 1 for the first scene | |
| XRAPI.goToState(index); | change state. Use index 1 for the first state | |
| XRAPI.goToStateByUid(uid); | change state. Pass state uid as parameter |
the three.js library is currently available at the global scope ( but may only be available as a module import in future updates ).
You can use it directly this way:
const geometry = new THREE.BoxGeometry( 0.2, 0.2, 0.2 ); ...
for questions regarding the API, email us at: contactus@xr.plus
May 5, 2021
On the analytics section you can find all details about views, activity and interactions with your project
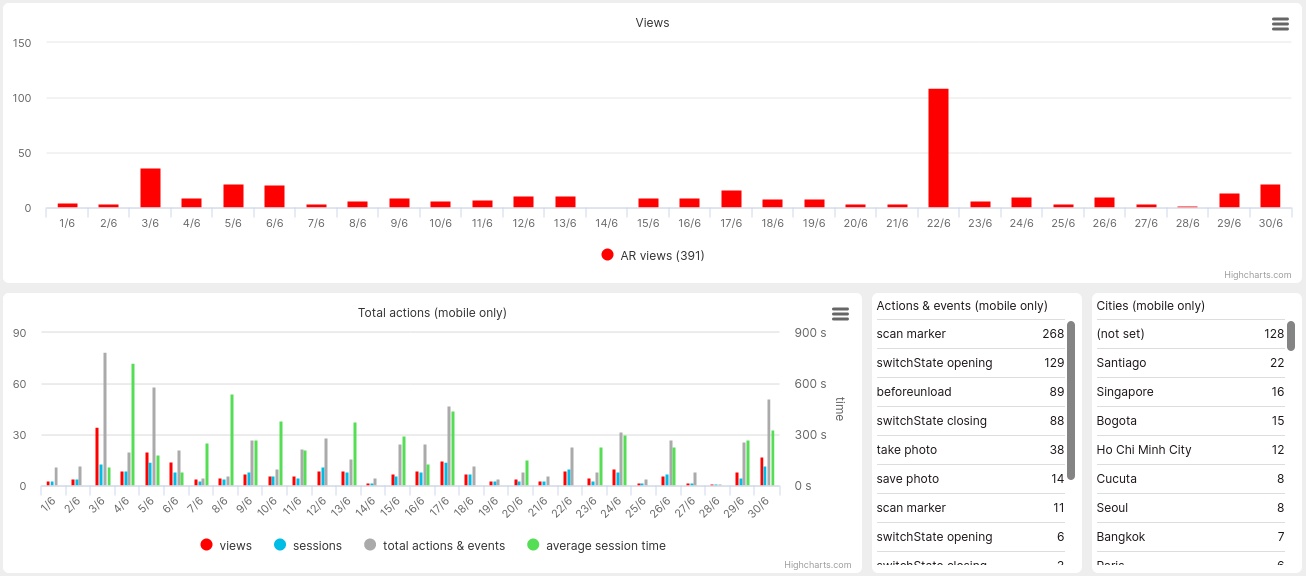
The First Row is displaying the amount of views by date.
The Total Actions section tells you about specific data for your experience: time, sessions and the average sessions time.
Action & events column is for interactions with events and possible interactions in your experience like taking a photo, switching to a state, scan an image tracking marker.
The cities sections is for where your experiences were viewed geographically, and the number of views filtered by cities.
All this data can be filtered by year, by month, or a date interval.
To remove XR+ branding visual elements, check this list (advanced & expert plan only):
In the project:
In the project skin:
Business users can load projects inside an external web domain within an iframe, like when adding a Youtube video player on a web page.
We provide a template to do so, no coding to do, just upload the .html file to your server.
Note: an SSL certificate (https:// …) on your web domain is required to embed projects.
It is very important to optimize your projects!
Try to keep your project total size (images + models + audio files + video files) under 10Mb, or even 5Mb.
On your 3D models, do not use oversized textures, and delete all faces that are hidden.
Short loading times and a smooth framerate always make an experience more pleasant for the end user…
On the left hand column, you can see an estimation of the time required to load your project, considering the mobile network speed.
Use as less assets as possible, import them once in the assets library and add them multiple times on the composition.
Don't import oversized images => do not import a 4096x4096 image that will only be used as a small icon!
In the scenes global settings, turn on 'Progressive download', this will allow the project to start as soon as assets used in the starting scene are loaded
Reduce the number of polygons in your 3D modeling software, reduce the size of each texture.
Export your 3D models as .glb and turn on compression in the export settings
When you share an XR+ web AR project on social medias or messaging application, a preview of the experience is displayed, here’s an example with a tweet:
The data pulled to populate tweets or other social media shared project previews consist of:
The image used is your project cover, so make sure it’s looking great!
The title and the description can be edited in the studio in ‘Publication’ > ‘Social share’.
May 6, 2021
| select multiple items | Ctrl + click |
| select all items | Ctrl + A |
| position tool | P or G |
| rotation tool | R |
| next scene | Ctrl + left arrow |
| previous scene | Ctrl + right arrow |
| delete selected items | Delete |
| undo last change | Ctrl + Z |
| save project | Ctrl + S |
| toggle assets library | Ctrl + L |
January 19, 2024
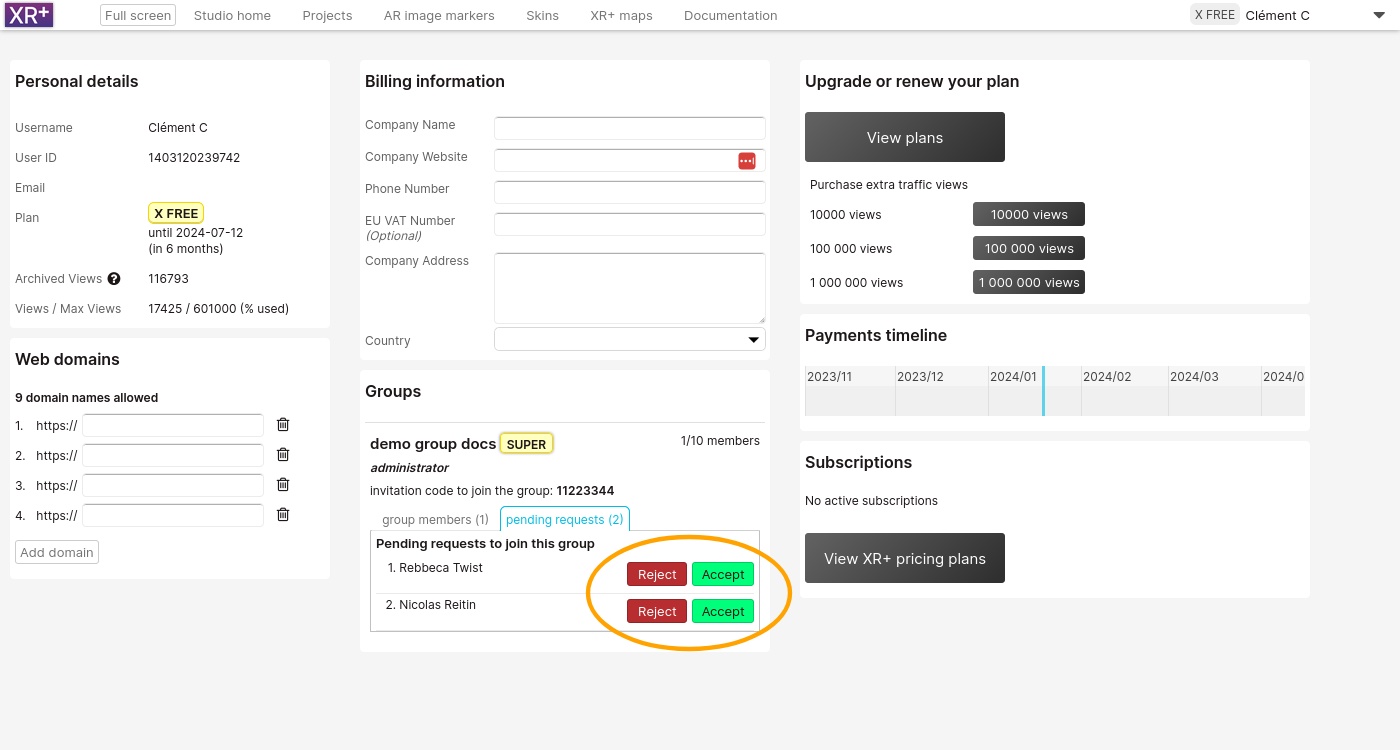
The following steps describe how to manage XR+ users groups available on the education licenses.
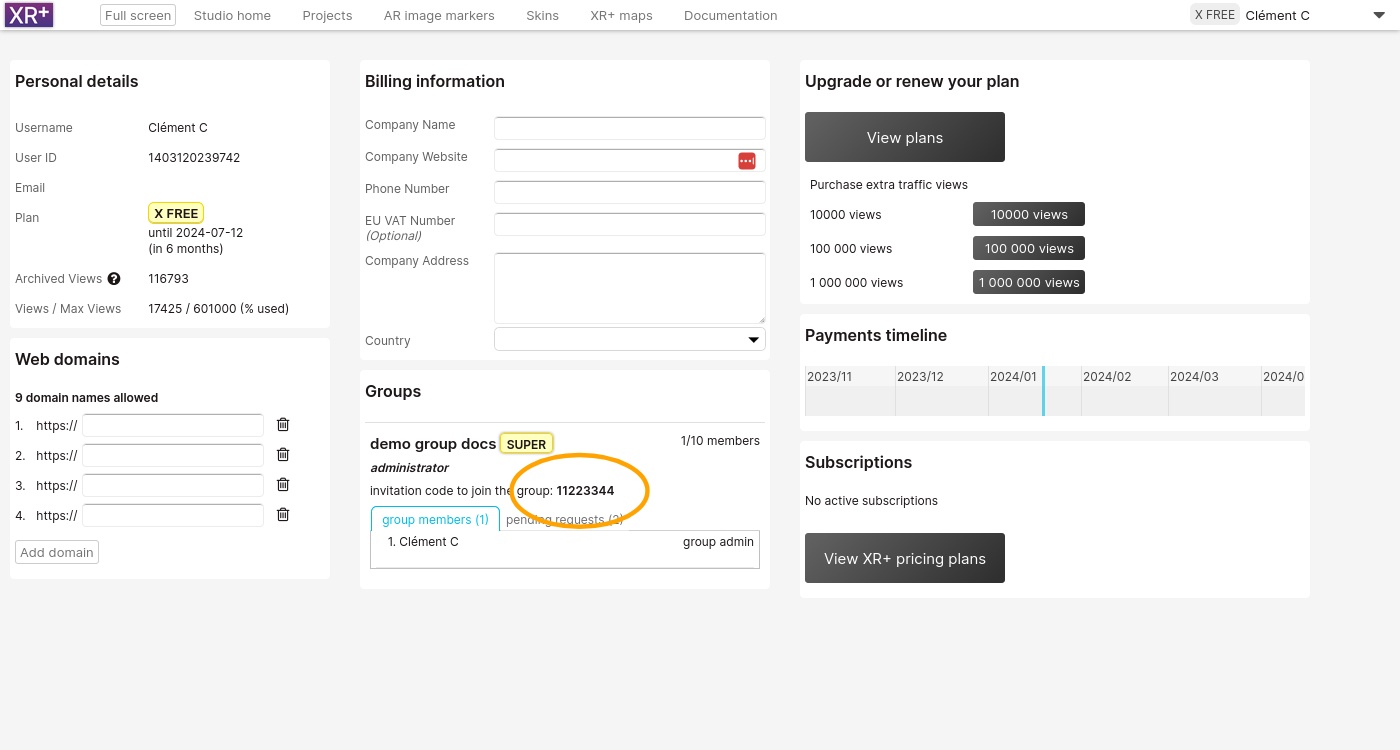
Once your group has been setup, go to your XR+ studio profile.
If you are the group administrator, an invitation code will be displayed. Share this code with your students so they can request to join the group.
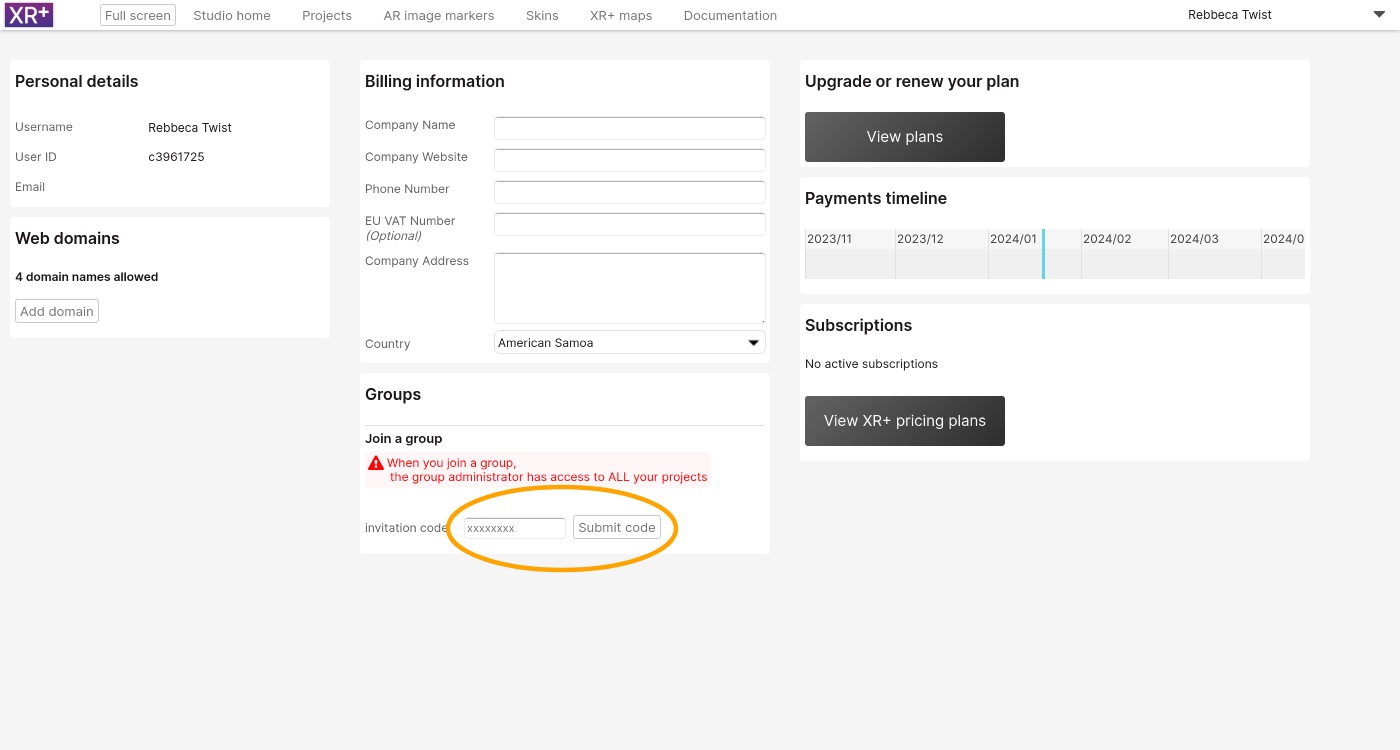
With this code, your students can request to join the group. This is done in the student XR+ studio profile area
The group administrator can now accept or reject the request
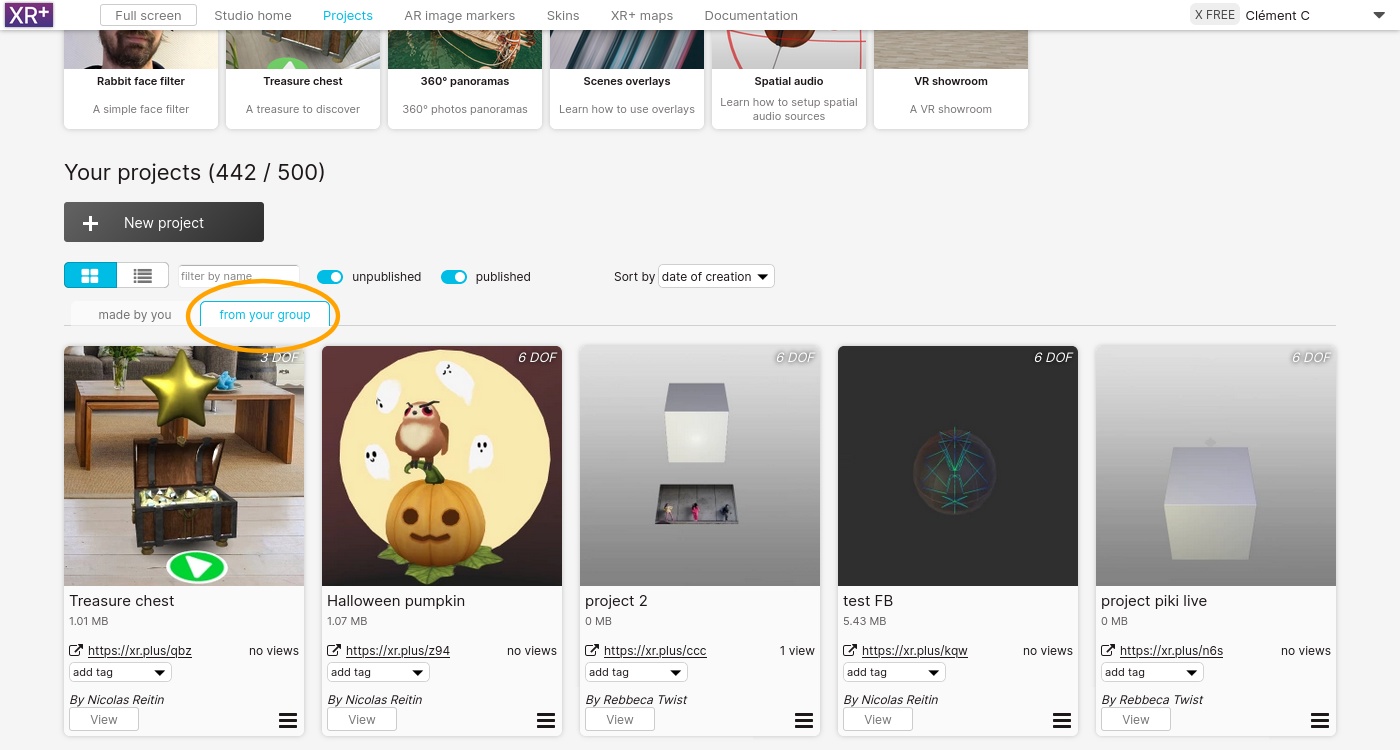
The group administrator has access ( as read only ) to all the group members projects. They are displayed the in the ‘from your group‘ tab, in the projects area
To learn more about XR+ education licenses, contact us